 Import Data Templates
Imports
Import vendor payments into the Business Central payment journal
Payments made outside Business Central, entered in the payment journal and applied to their invoices in one import.
Vendor payments are not always made from Business Central. Some are released in the bank's online portal, some by a payment service or by the group's treasury, some by a shared service center on behalf of the company. What comes back is a list of the payments made, and each one has to be entered in the payment journal and applied to the invoice it pays.
With Import Data Templates, the list becomes payment journal lines in the batch you choose when the import starts. Each line carries the vendor, the amount and the invoice it applies to, and the bank account is asked once when the import starts and written as the balancing account of every line.
What the file can look like
One row per payment: the posting date, the vendor, a payment reference, the amount and the number of the posted invoice it settles. A vendor paid for several invoices appears on several rows, which can share the same payment reference. Values the file does not carry, such as the account type, the document type or the applies-to document type, are set by the template.
The sample below is the example shipped with the app. Before importing it, replace the invoice numbers with posted purchase invoices of your company.
Sample file: EX-VENDOR-PAYMENTS.csv
- Sample file: EX-VENDOR-PAYMENTS.csv
How the import works
-
Load the template
Create
EX-VENDOR-PAYMENTSfrom the Template Examples page, or describe your own file in a template: fill it in from the structure of the file, use Read Structure from File to build it from the column headers, or let Copilot propose it from a sample file and review it before keeping it.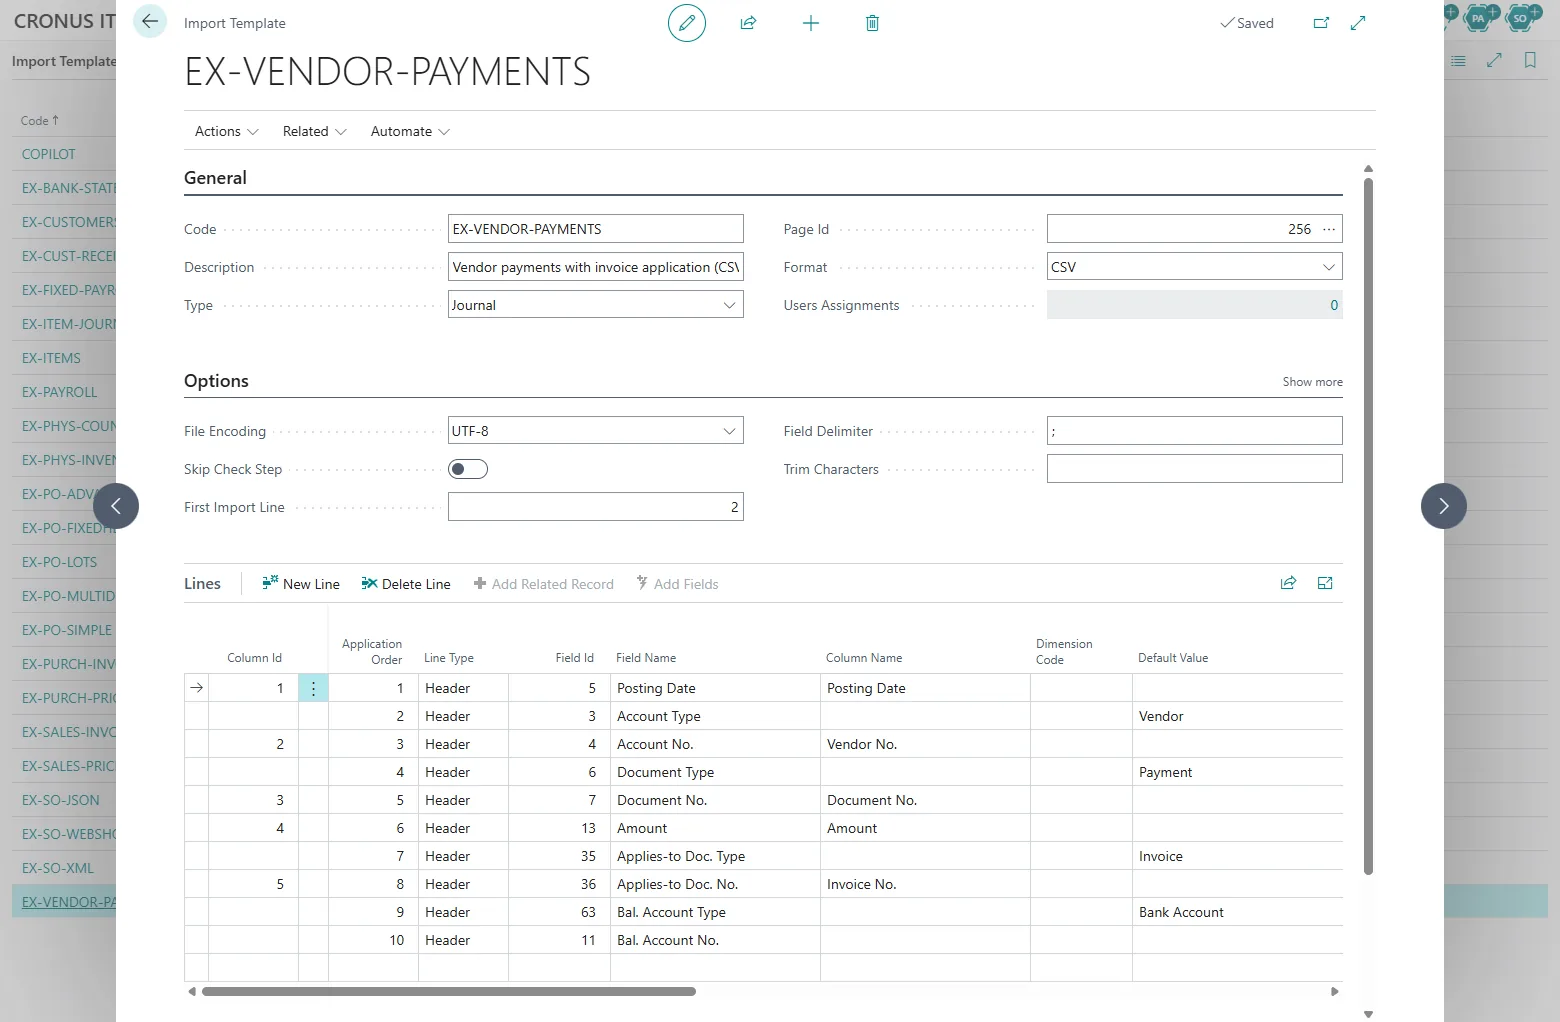
The EX-VENDOR-PAYMENTS template: five columns from the file, the rest set as default values. -
Start the import from the payment journal
Open the Payment Journal, pick the batch, choose Import Template, then the template and the file, and select the bank account when asked. The check step validates vendors, amounts and the invoices to apply to, and lists every problem with the line of the file before any line is written.
The flow on the Payment Journal: Import Template, the template, the file, the bank account. -
Review and post
The payment lines are in the batch, each with its Applies-to Doc. No., ready to be reviewed and posted like payments entered by hand; posting applies them to the invoices, which close when fully paid. The import history records the file, the user, the date and the number of lines created.
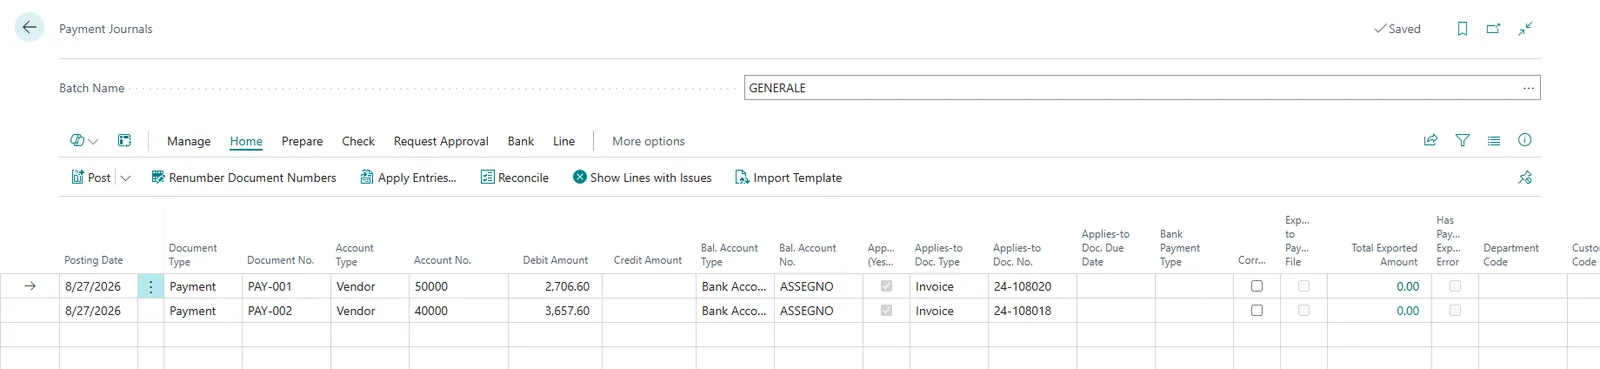
The batch after the import: each payment balanced against the bank account and applied to its invoice.
Beyond the basic file
- The vendor codes in the file are the payment system's, not Business Central's: a mapping rule translates them during the import.
- Amounts arrive with the opposite sign, or in cents: transformation rules invert or multiply them.
- The posting date is not in the file: an import parameter asks for it, or a default value sets it.
- The lines should be posted without a review: a line table action posts the journal at the end of the import.
- The payment list is written to a SharePoint, Azure Blob Storage or Azure File Share folder: the automatic imports pick it up without a user.
Questions
What if a payment has no invoice number?
The line is created without an application and can be applied in the journal with Apply Entries, as for a payment entered by hand.
Which invoice number does the file need?
The number of the posted purchase invoice in Business Central, the one Applies-to Doc. No. expects. If the file carries the vendor's own invoice numbers instead, they have to be replaced with the posted numbers before the import.
Can the same template post customer receipts?
Customer receipts belong in the cash receipt journal; the cash receipt journal page covers them with a template of the same layout.
Import Data Templates is available on Microsoft AppSource with a one-month free trial. Licenses are assigned per user in the Microsoft 365 admin center.